Tuesday, March 8, 2011

The Butcher or Scalping Knife


Cunne Shote by Parsons ca.1762


Aside from the leggings covered earlier, another interesting culture crossing commodity that shows up with our 18th century back country kit is the butcher or scalping knife. Some of these men were carrying imported cheap fixed blade knifes that seem to have mirrored what was commonly sold for the Indian trade, sometimes referred to as"Scalping" knives or "Butcher" knives. The line between a domestic kitchen and trade items may have been very blurry in this instance.

A wide variety of handles can be found in period documents including wooden ( frequently oval or faceted and in 'yellow' woods like box, 'red' such as cam or barwood and etc.) and bone.  Prices ranged a bit depending on which material was used.

 Kent's Susquehanna's Indians has a nifty (early) PA estate inventory from Martin Chartier's (d 1718) store [p 63 of Kent and Logan Papers X: 110 Hist Soc of PA printed in Lancaster Co HS papers XXXIX (10) 130-33, 1925] that includes :

    ...To 10 Box handled knives at 6d...
    ...To 9 dutch Knives @ 5d...
    ...To 5 bone handd Knives @ 6d...


The Papers of Henry Laurens contain another box handled knife reference specific to Butcher knives:

"3 doz.  & 10 Clasp knives, 3 doz. box handles Butcher knives, 3 1/2 doz. Split bone handle do...6 doz Buck Spring Knives, 4 doz & a Small do. 2 doz. buck handle Knives, 2 Blades, 5 dozen Inlaid Small Knives, 2 Doz & 3 Black handle ditto, 13 Ivory Handle pen knives[p378] 1 doz. Large Buffler knives..."


(Sept 12, 1747- Sept. 11, 1746-Oct. 31, 1755  page 376 [Appendix] Inventory of John Lauren's Estate )


“Account of all the merchandize &c. Debits & other property belonging to the Co partnership of Taylor & Duffin. Niagara, 27th. May, 1779.”

[Page F.]
"__________________________________________________[Sterling__[Total]
35 dozen + Eight Red Wood handled Scalping Knives_____3/-_____5 “ 7 -
7 dozen Camwood_____________________ditto_____________3/6_____1 “ 4 “ 6
4 1/2 dozen buck Handled____________ditto_____________3/9_____- “ 16 “ 10 1/2...”


Public Archives of Canada. MG 23 H I I 2.

This trend continued some time

"Memorandum of articles wanted to make up an assortment of presents to the Indians expected at the head of the river St. Mary's,' in Georgia, November, 1792...
'Fifty dozen knives, commonly called scalping knives: those made in the size and shape of carving knives are best, and if bone handles, more acceptable."


 [Citing "State Papers, Ind., I, 312." p. 37."Tennessee Historical Magazine" St. George L. Sioussat, editor. Volume I. Tennessee Historical Society. Nashville, 1915.Google Books.]

Most of the butcher and scalping knives seem to have had a 7 inch or so up-swept tip like the knife shown above.  A mixed bag of dug examples can be seen here at  Grand Portage National Monument.

 A similar blade shape can be seen in some English domestic scenes such as

A Fishmonger by Sandby (London ca 1759)


and this painting of John Slack, Park Keeper of Lyme (by Joseph Watson, Ca. 1750)


 For a few references:

An accurate and interesting account of the hardships and sufferings of that band of heroes : who traversed the wilderness in the campaign against Quebec in 1775
By John Joseph Henry

"http://archive.org/details/cihm_35679

"The principal distinction between us, was in our dialects, our arms, and our dress. Each man of the three companies, bore a rifle-barreled gun, a tomehawk, or small axe, and a long knife, usually called a "scalping-knife," which served for all purposes, in the woods. His under-dress, by no means in a military style, was covered by a deep ash colored hunting-shirt, leggins and mockasins, if the latter could be procured. It was the silly fashion of those times, for riflemen to ape the manners of savages."


A tour in the United States of America
J.F.D. Smyth

http://catalog.hathitrust.org/Record/009714359

“They wore fringed hunting shirts, dyed yellow, brown, white and even red; quaintly carved shot-bags and powder-horns hung from their broad ornamented belts; they had fur caps or soft hats, moccasins, and coarse woolen leggings reaching half-way up to the thigh. Each carried his flintlock, his tomahawk, and scalping knife.” 

A typical example excavated near Fort Haldimand, N.Y.from Historical Image bank 


On the extremely cheapo end of the scale, some folks have been reworking older butcher knifes to fit this profile, others have turned to reworking the "kitchen knives" sold by Avalon Forge (I suggest sanding the red paint off and making sure the blade isn't stainless steel as these vary quite a bit!):


http://www.avalonforge.com/MainCookEat.htm


Another option is to commission a reproduction to spec, and I have gone that route with Ken Hamilton (shown in the picture below). Several others are also offering these, but I haven't tried them out yet.

I am once again indebted to fellow obsessive researcher Steve Rayner who generously provided a good portion of the leads and citations in this and many other posts!

Photobucket

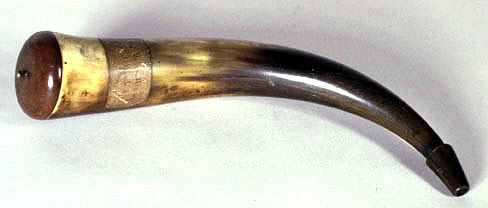
Making a Powderhorn

I finally got around to making a powder horn, something I had wanted to try after picking up this book a while back:


http://www.trackofthewolf.com/categories/partDetail.aspx?catId=1&subId=12&styleId=39&partNum=BOOK-R18CPH&AspxAutoDetectCookieSupport=1&as=1

Overall it covered the process very well, and I recommend checking it out- even if you have done this before, it had some great hints and templates worth exploring.

I had previously purchased a very simple, plain horn (similar to the McAfee horn below but with a flat base plug) from horner Jim Leach, I highly recommend starting with something on the plain side. J.D.F. Smyth and at least one Va Gazette runaway ad mention carved horns but surviving examples are few and far between. Unlike some other regions (ie F&I era Lake George, 1740s or 1770s New England schools), there aren't a ton of published horns with an 18th century Virginia provenance (carved or plain) that I have been able to find (exclusive of the Fort Pitt/Forbes road horns).

For a great discussion of Virginia and Pennsylvania horns I highly recommend viewing Mike Burke's excellent 2018 School of the Longhunter lecture at Prickett's fort

Part 1
Part 2

As an aside, a nifty base plug from a horn was excavated from Fort Ligonier in PA and is shown in ARCHAEOLOGICAL INVESTIGATION OF FORT LIGONIER 1960-1965 by Grimm. It was 2.6 inches in diameter, about 1/2 inch thick at the thickest (flat interior surface, convex top) and had originally been fastened with pegs that were replaced with nails during it's working life. Two nails secured the now missing strap to the plug.


Portrait of John Seabrook (1768–1844) by The Payne Limner, 1780, Richmond, Virginia. Oil on canvas; HOA (canvas): 38-1/8”, WOA (canvas): 32-1/2”. Collection of Patricia S. and William T. Wilson, III; on loan to the Museum of Early Southern Decorative Arts (MESDA), Acc. 5975.3


For other online images of horns with a Virginia provenance, American Revolution Center has images of the Waller horn in their time line.


and on the plainer side, the "McAfee" horn is online here at Cowan auctions (far left, large domed plug):

Guilford Court House has another example:


Powder horn
Used by a Virginia militiaman in the battle of Guilford Courthouse.
Horn, metal. D 7.8, L 36 cm (roughly 14 inches long x 3 inches in diameter)
Guilford Courthouse National Military Park, GUCO 1999


William Fleming's 1782 Powder horn at MESDA

Since I had the plain end of things well covered, I elected to try a large lobed horn with a horn I picked up from Track of the Wolf.

First, the interior hollow was measured and the tip was cut off, then the horn was scraped and filed overall a bit.

Photobucket

Then the opposite end was cut off, and I drew in the lines for my "lobes".

Photobucket

Then using a saw and file shaped them

Photobucket

until I got the basic design I wanted and drilled the strap holes into the lobes.

Photobucket


I began forming the base or butt plug out of some pine.

Photobucket


I worked at this until I got a pretty good friction fit-this image shows that portion of work in process.

Photobucket

Once the pine plug was snug, I drilled six holes and attached the plug with wooden pegs.

Photobucket

The pegs were then cut flush and I applied a bit of linseed oil to the exterior of the plug to help seal it from moisture. I then turned my attention to shaping the other end of the horn with a file and knife. I started by marking flats and lines and worked them down with a file.

Photobucket

Polished that up a bit (more filing) and carved a soft wood plug.

Photobucket

The horn is now ready for dying, engraving or adding a strap if that isn't desired (a thin leather strap, hemp webbing or a cord works for many applications). I elected to keep this horn looking fairly "new" I don't personally understand why folks want to carry horns that look 250 years old to reenactments, but hey suit yourself! Overall, my horn is a bit on the clunky and crude (home made looking) side, but is functional and came together for under $20 in materials.

Photobucket

After a bit more tinkering:

Photobucket

some nifty 18th century info on dying horn can be found here:

http://books.google.com/books?id=k5jcid_fsa4C&pg=RA1-PT652&dq=to+dye+horn+yellow&hl=en&ei=z9ScTaP9CaPn0QHS67XlDA&sa=X&oi=book_result&ct=result&resnum=3&ved=0CEsQ6AEwAg#v=onepage&q=to%20dye%20horn%20yellow&f=false

Thursday, March 3, 2011

Breechclouts and Leggings the Low Budget DIY plan


Above:
An Indian War chief completely equipped with a scalp in his hand
by George Townshend, 4th Viscount and 1st Marquess Townshend
pen and ink and watercolour, 1751-1758


from:

http://www.npg.org.uk/collections/search/largerimage.php?mkey=mw08868


Having finished our shirt to cover above, we will now discuss a way to cover below while you are saving your pennies to get a pair of leather breeches made up by a pro (just like in the 18th century!). These aren't the nicest ones ever, but they will do while building the low budget Va backcountry kit! Although the everyday dress of the 18th century Virginia man usually consisted of a pair of breeches, a waistcoat and coat, some men in the backcountry adopted "Indian dress" for hunting and militia service. Some backcountry stores in Virginia sold cloth for leggons, others possibly ready made leggings.

Nicholas Cresswell :

Kentucky River--Saturday, June 10th, 1775. The people at the Camp we lodged at last night gave us some jerked meat. On inspecting our flour, found it does not amount in the whole to more than 15 pounds amongst 5 people. Must make no more bread but save our flour for soup. Proceeded down the River. These people behave very kind to me, I believe there is but two pair of Breeches in the company, one belonging to Mr. Tilling and the other to myself. The rest wear breechclouts, leggings and hunting shirts, which have never been washed only by the rain since they were made.


Von Reck (Georgia 1736) The supreme commander of the Yuchi Indian nation  Kipahalgwa

From a 1775 Broadside circulated in Philly:

"The Virginian back Woods Men have a very good Reason for their hunting shirts, for as they wear no Breeches, Decency requires that their upper Dress should be of this Form "


First we will consider the breechclout, which was basically nothing more than a rectangle of wool cloth, sometimes lined with linen or cotton and decorated with ribbon and other ornaments for the Indian trade.

For our purposes, I suggest finding a decent mid-weight blue woolen cloth that will hold a raw edge and has a decent firm finish to it's surface. Blue and red cloths predominated the Indian trade, and numerous accounts for Virginians mention blue leggings, so without information to the contrary it is a safe choice.

Virginia Gazette
(Rind), Williamsburg ,
July 14, 1768.

Augusta, June 20, 1768. RUN away from the subscriber, near Buchanan's ferry, the 5th instant, an English convict servant man, EDWARD HICLY, about 30 years of age, about 5 feet 6 inches high, stoops, and has dark brown curled hair, of a fair complexion, and pitted with the small pox; had on a light coloured jacket, double breasted, but no buttons on it, with slash sleeves, leather breeches, white yarn stockings, blue leggings, old shoes, and an old felt hat. Whoever takes up the said servant, and secures him so that his master may have him again, shall have forty shillings if taken in this county, if in another, four pounds reward, by me
JAMES LADERDALE.


Virginia Gazette
(Rind), Williamsburg ,
June 16, 1768.

RUN away from the subscribers, in Augusta county, in the forks of James river, two convict servant men, one named Israel Cowen, aged about 27 years, about 5 feet 7 inches high, of a dark complexion, his head bald and blind of his left eye. He had on when he went away, a new felt hat, an old thickset coat, with tortoise-shell buttons, a blue broadcloth jacket, trowsers, and old shoes. The other named George Wilkinson, aged about 20 years, about 5 feet 6 inches high, of a sandy complexion, and red hair. Had on when he went away, a new felt hat, hunting shirt and callico waistcoat, with old buckskin breeches, blue leggings, and old shoes. Whoever takes up the said servants and secures them in any gaol in this colony, shall have five pounds reward, and if but one of them, fifty shillings, besides what the law allows, paid by us,
ROBERT WHITLEY,
JOHN MAXWELL.


For most men, 2 yards of 54 to 60 inch wide cloth will suffice.

"Blue stroud Breech cloths 3/8 Yard each" Provision list page 75 Amherst papers Heritage books

"Leggings of half thicks 1 1/4 yard each" Edmund Atkin Provision list page 75 Amherst papers Heritage books


http://heritagebooks.com/mm5/merchant.mvc?Screen=PROD&Store_Code=HBI&Product_Code=M1131&Category_Code=va


A pair of green woolen leggings were featured in the Clash of Empires exhibtion. Catalog notes (page 15) mention that they are 60.5 x 22 cm (approx 23.8 inch x 8.6 inches)


Photobucket


Step 1. Rip or cut a 1 inch strip that runs the width of the fabric. This, once tied around the waist, will serve as a belt or girdle to suspend the clout.

Step 2. Rip or cut another rectangle of cloth 3/8ths of a yard ( about 13.5 inches) x the fabric width for the clout.

Step 3. Using the remaining cloth, cut or rip two more 1 inch strips that run the fabric width.

Step 4. Cut both of the 1 inch strips from step #3 in half. This will function as a garter for the leggings when tied around the finished product, and can be a "suspender" belt from the outside edge to the waist belt.

Step 5. With the remainder of the wool, cut two rectangles about 27 inches square.

Step 6. Fold the 27 inch squares in half, and with some assistance pin them to your legs with the fold on the instep and the flaps to the outside (wearing stockings and or breeches at this time is a good idea if you will wear them with the leggings). A snug but not leg numbing fit is the way to go for maximum comfort. Blue toes are not a good thing.

Step 7. Use a running or Back stitch for the exterior seam along the pinned edge, If desired, you can leave a few inches open at the bottom of the leggings, and sew two or three hooks and eyes to hold them closed as seen on the Caldwell leggings. For further info on that pair, including nice detailed pics, check out "Re-Creating Sir John Caldwell's Leggings." by Ted Franklin Belue, S/O, page 38. Muzzleloader Magazine 1998 (thanks to Fred for that info!):

http://www.muzzleloadermag.com/Index_of_Articles/index_1998.html


Dave B recently linked this interesting info from 96 in South Carolina which seems to confirm the use of hooks and eyes on leggings may have been pretty widespread (thanks Dave!):


http://www.nps.gov/seac/arch-96.htm


The trenches exposed in this area were found to enclose an area 85 by 150 feet. These trenches were found to end at three places with each of these places containing "footing holes" (post holes) for three structures. The south structure had seven footing holes that formed a rectangle 15 by 30 feet, the west structure was represented by six footings forming a square 19 by 21 feet, and the north structure had four footing holes and measured 21 by 32 feet. When matched with a 1821 map that portrayed Williamson's Fort of 1775, these three structures matched those structures identified as John Savage's barns shown on the map. A fourth building was also shown on the map, but South didn't investigate this; he simply extrapolated its location. A bastion was found just west of the south barn location. Most of the fort had been intruded upon by Holmes Fort. Very little excavation was done in the ditches (which were found to be one foot wide and two feet deep). Near the center of the area of Williamson's Fort, a rectangular pit was found measuring 3.8 by 8 feet, and 2 feet deep; thought to be a possible burial, there was no evidence of a body. A few feet to the north of the south barn, a larger shallow feature containing a two by six feet burial pit was found. This pit contained human remains, a large pocket knife (at the hip), large brass coat buttons (near the center of the body), pewter buttons (near the rib cage), and brass wire eyes (near the ankles) (South 1972:30). It is possible that these are the remains of James Birmingham who was the sole fatality in the brief conflict at the fort between Loyalists and Patriots in 1775.

Step 8 trim some of the excess material outside the seam.

Step 9. Apply the suspender strips to the exterior of the legging by whip or back stitching.

Step 10. Extra scraps can be used as a loop that passes under the foot (inside the moccasin or shoe) if desired, (see the Caldwell leggings).

Another leggings tutorial

Wednesday, March 2, 2011

shirt construction 4 finishing touches

Photobucket


Having top stitched down the shoulder straps, I then added two buttonholes to each cuff or sleeve band for sleeve buttons. Sleeve buttons aka cuff links are commonly found at 18thc frontier and non frontier sites- several folks carry repros of them, my faves are from:

http://www.attheeasterndoor.com/

I also added thread buttons for the collar (mine turned out a bit too rough, I will likely purchase ready made ones from Burnley and Trowbridge to replace these if my second attempt is as bad) and corresponding buttonholes on the collar. Many stores in 18th century Virginia carried buttons for shirts, for instance:

Inventory of Sundry Goods the property of Messr Glassford & Henderson taken at their store in Dumfs [Dumfries] September ye 21st, 1772 p19
"2 3/4 Groce wire Shirt Buttons   1/6
1 1/4 Groce Ditto    2/6"


Photobucket


I also added a web of thread at the bottom of the slit in front to keep that secure and need to top-stitch the cuffs and etc. (great directions for this are in the Tudor Tailor) or you can do the applied heart reinforcement thing shown here:


http://www.marquise.de/en/1700/howto/maenner/18hemd.shtml


Photobucket

The finished product isn't as nice as I'd liked (wish I had been more patient, used smaller stitches and done a better job pleating things more evenly) but I did end up with a basic coarse shirt that is usable for our purposes here. Anyway, free advice and worth every penny! I highly encourage folks to follow Neal's instructions ( http://frontierfolk.net/phpBB/viewtopic.php?f=2&t=28742&start=0 ) as I am quite the amateur at this stuff!

shirt construction part 3 CUFFS or sleeve bands

Photobucket

At this point, I basically did the same to apply the sleeve bands or cuffs, running stitch to gather the open end, pin down the open cuff, cover the raw edge, whip down the interior and then top stitch.

Photobucket

shirt construction continued 2

Photobucket


At this point, I added the neck gussets and pinned down the shoulder straps, then ran a loose running stitch through the neckline, in order to gather the neck into the collar.

Photobucket

The back of the collar was pinned down the rear of the shirt and sewn down:

Photobucket


raw edges shoved into the collar opening (including the shoulder strap), then collar applied with a whip stitch on the shirt interior. The whole shebang was then top-stitched.

Photobucket

Shirt construction continued

First, I washed and dried the linen, then cut out the necessary parts (NB the cuffs or sleeve bands should be small for this period, 1" or so when finished).

Photobucket

Next, the side seams were flat felled, a good intro is here:

http://www.midtown.net/dragonwing/col0006.htm


Sleeve tubes were sewn together with a back stitch, then felled, underarm gussets applied to the sleeves.

Photobucket

Then the sleeves were attached to the body (shoulder straps being pinned in).

Photobucket